Radu Rendec This is my blog. Use the information and content at your own risk. All opinions are personal. Please see the disclaimer for details.

DIY Home Automation focused on privacy

I started this project because I wanted to automate my home. But unlike many others, I am deeply concerned about privacy. And besides, I am a software engineer and an electronics enthusiast, and I always enjoy tinkering. So, I decided to take the matter into my own hands.

First and foremost, this is a hobby project. It does not aim to be perfect, easy to deploy and use or fit for every home. But it aims to be fun and respect privacy. And I decided to share it with the world. In fact, all source code and hardware designs are publicly available on GitHub (see below).

The project is in a state of flux. At the time of writing this blog post, I have been working on the project for more than 3 years, and it's nowhere near complete. It probably never will be because I have more ideas than time to implement them. I have a day job and a family, so I work on the project when I can. It is therefore work in progress, and will likely be for a long time.

Design goals

Use only free open-source software (FOSS)

Twenty or even ten years ago, it may have made sense to explain the power and benefits of FOSS. But today, I think it's very clear, and the internet is a living proof. Whoever doesn't get it is probably still stuck in the 20th century.

Send absolutely nothing to the cloud (privacy first)

In other words, what happens in my home stays in my home. This is extremely important in a digital era when everybody is after your data. Unfortunately, most people don't get it, and neither do they care to read the privacy policies for the services they use. Speaking of which, in most cases users waive pretty much all their rights and agree to have their privacy violated for free.

You may wonder why it matters if a random service provider knows when lights turn on and off in your home or what temperature your thermostat is set to, and furthermore if that data is disclosed to other third parties, intentionally or not. That data alone says something about your schedule and habits. But when it is correlated with other personal data, things get much worse.

And last but not least, voice command systems are likely the most dangerous. They must record permanently to be able to respond, because they can't know in advance when you talk to them. And, since most of the processing is done off premises, the recordings are in the hands of your provider, and you have no control over that. It is impossible to tell if they respect the privacy policy (which is way too permissive anyway), let alone fight them in court if there's any suspicion.

And I could go on for pages about why all of this is important, but I will leave that for a separate post.

Use DIY hardware as much as possible and to a reasonable extent

Proprietary hardware can be as bad as proprietary software, and pretty much for the same reasons.

Luckily, hardware is easier to confine than software. For example, a Zigbee device cannot leak any data to a third party simply because there is no communication channel to the outside. And that makes it acceptable to use a Zigbee device even if the hardware and firmware are not open.

Along the same lines, most WiFi based home automation devices and smart appliances inherently violate the privacy. Not because of how WiFi works (you can always block the communication in your router), but because they allow no local/direct control and depend on a cloud service and your internet connection to be controlled.

Most manufacturers don't get it, or at least they pretend they don't. We don't need their sketchy mobile app (which often is a privacy hazard just by itself) or their cloud service. The ease of use they offer comes with a very high toll on privacy. Remote control can be done safely and privately with FOSS, but requires extra work, which I am happy to do.

Architecture

As mentioned before, the project is in a state of flux. The diagram below shows the current architecture, in terms of both hardware and software.

Home Automation Architecture

Legend:

  • Yellow boxes represent standalone off-the-shelf hardware.
  • Gray boxes represent support hardware, either off-the-shelf or DYI.
  • Blue boxes represent third party FOSS.
  • Orange boxes represent personal FOSS.

The "?" (question mark) box is essentially a home automation controller but it is not yet deployed, and I am still exploring multiple options. I am considering the following FOSS projects, likely in that order:

Even though it is not included in the architecture diagram, I am also considering voice control but this is particularly sensitive from a privacy perspective, since most solutions send the audio stream to the cloud for voice recognition and semantic interpretation.

Rhasspy Voice Assistant looks extremely promising. However, the project relies on other external projects for each of the main features (wake word, speech to text, intent recognition, text to speech), and with the multitude of choices for each feature, it is harder to make a decision. It will likely also influence the choice of home automation controller, even though all three projects listed above are readily supported.

The table below summarizes the software components and DIY projects that are currently part of the architecture.

Project Description
Zigbee2MQTT Zigbee to MQTT bridge
Eclipse Mosquitto Message broker that implements the MQTT protocol
Memcached A distributed memory object caching system
Graphite An enterprise-scale monitoring tool
yawd Collect and display local weather data
hvac-app HVAC controller - application software
hvac-eda HVAC controller - hardware design
aqmon-app DIY indoor air quality monitor - application software
aqmon-eda DIY indoor air quality monitor - hardware design

GTK3 Legacy Behaviour

Starting with the very decision of discontinuing Gnome 2 and writing Gnome 3 from scratch, the Gnome developers have had a strange way of innovating. The early versions of Gnome 3 were barely customizable, with a lot of features that had matured and stabilized in previous versions being completely gone. Since that moment on, the developers have continued in the same manner, by radically changing or completely removing features, without any way of reverting to the old behaviour. They started making choices for their users, instead of letting the users choose by themselves. And they have been constantly insisting on this policy.

Luckily, users still have the choice of completely switching to a different desktop environment. Just like I did. As I had been using Gnome for a long time (and considered Gnome 2 a mature and robust desktop environment), the natural choice for me was MATE Desktop Environment, which I have been consistently using ever since.

However, the GTK3 library suffers from the same obtuse policy of limiting users' freedom, and recently many important desktop applications (such as Firefox and LibreOffice) have switched to GTK3. For users like me who don't want their desktop to start behaving differently over the night, perhaps one of the most annoying things in recent GTK3 versions is the default behaviour of the file chooser. This article mentions some popular GTK3 problems and the solutions to fix them.

Overlay Scroll Bars

By default, scrollbars are now hidden and appear on-demand, when you hover the mouse over the scrollable area edge. The problem is that they are rendered over the scrollable area content, hiding some of it. If you prefer traditional scrollbars, you can switch back to the old behaviour by adding this to your .bash_profile file:

export GTK_OVERLAY_SCROLLING=0

References:

Show Directories First in File Chooser

By default, the GTK3 file chooser mixes directories and files in the list. If you're looking for a particular directory in the list, this makes it harder to find it. This can be easily changed by a configuration option:

gsettings set org.gtk.Settings.FileChooser sort-directories-first true

If you prefer a GUI, there's dconf-editor, which allows you to browse to /org/gtk/Settings/FileChooser, see a list of available settings and their allowed values and change them as you like.

References:

File Chooser Typeahead Search

In previous GTK versions, you used to be able to focus on any file/directory in the list, start typing, and this would jump to the matching file/directory in the already loaded list. In newer GTK3 versions this is no longer possible. Starting to type switches the list to recursive search results matching what you typed. If you have a large directory structure, this is not only very slow and resource consuming, but also completely useless - because you end up with a dozen of search results from not only the current directory but also subdirectories at any level, all mixed together in a flat list.

Unfortunately, at the time of writing this there is no setting for changing this behaviour and the only way to fix it is to patch GTK3 and recompile. The patch is available in a custom ArchLinux package. I also built some custom GTK 3.20.6 packages for Fedora (see below).

References:

File Chooser Single Click Selection

In previous GTK versions, you used to have to double click on a file or directory in order to choose it. By "choose" I mean pick that file for open/save and close the file chooser. This is not to be confused with "select", which means just moving the focus on that file in the list.

In newer GTK3 versions this is no longer the case. The new behaviour is to use single click, but even that is not consistent:

  • If the file/directory is already selected, then a single click will choose it as expected (or recurse into it, if it's a directory). If you double click on it (because you're used to the old behaviour), it will not be handled as a double click event. It will be handled as two single click events. The first one will choose the file/directory. And, mostly annoying, if the first click recursed into a directory, the second click will choose whatever is there (at that mouse pointer position) in the previously chosen directory.
  • If the file/directory is not already selected, then the first click will not choose it, it will just select it. The second click will choose it. Again, if you double click, it will handle two single clicks (not a double click), but the behaviour will be similar to the old double click.

Unfortunately, at the time of writing this there is no setting for changing this behaviour and the only way to fix it is to patch GTK3 and recompile. The change was introduced by a single commit, which can be reverted. The reverse commit does not no longer apply cleanly on GTK 3.20.6, but can be easily applied manually. I also built some custom GTK 3.20.6 packages for Fedora (see below) and you can take the patch from there.

References:

Custom Fedora Packages

Custom Fedora GTK3 packages that contain both the typeahead and the single click fix are available in my copr repository.

Qt Looks in Fedora 24

OK, so I recently upgraded to Fedora 24. Not so many surprises, but one of them was that suddenly the scrollbars in all Qt applications used a different theme. Most probably not only the scrollbars, but those were strikingly different.

As a background, I'm using MATE Desktop on Fedora, with the TraditionalOk theme and Mist icon set. So normally my desktop looks pretty much like the default Gnome 2 desktop before Fedora 15 (when they decided to drop Gnome 2, because it had been discontinued upstream).

To begin with, Fedora 24 is at the transition point between Qt 4 and Qt 5. For this reason, older applications still use Qt 4, while newer have switched to Qt 5 already. And of course there are some legacy applications like Skype for Linux that are stuck on Qt 4. This is not a problem at all, but it may not be obvious to you (as it wasn't to me before I ran into this problem) that Qt 4 and Qt 5 have totally different configuration systems.

Fixing Qt 4 Appearance

  • Install the qt4-config package and then run qtconfig-qt4.
  • In the default Appearance tab, select GTK+ for GUI Style.
  • Click File - Save. That's it, you're done. Now Qt 4 applications are fixed.

Fixing Qt 5 Appearance

Quoting from the official release notes, Fedora 24 introduces QGnomePlatform, a Qt Platform Theme that aims to take as many of the GNOME settings as possible and apply them directly to Qt applications, thus enabling the Qt applications to fit more consistently into the GNOME Desktop.

So all you have to do is install the qgnomeplatform package and then suddenly all Qt 5 applications will start to look like your GTK theme. They will even use the GTK file dialogs. This is awesome.

References:

TUN/TAP Tunnels

This is not a tutorial about how to use the TUN/TAP driver and related tools. A very good tutorial with many useful comments is available here.

This article focuses on a very specific use case of the TUN/TAP driver: to create a tunnel with both ends on the same host and to be able to route traffic through that tunnel. The main applications of this configuration are protocol (stack) prototyping, analysis and/or testing.

Typical Use Case

The following diagram shows the typical use case of the TUN/TAP tunnels. The client and server applications (in the top) can be any typical Linux applications, for instance a web browser and a web server or an ftp client and an ftp server. The prototyping application (in the bottom) is the application that receives and processes all the traffic that passes through the TUN/TAP interfaces.

TUN/TAP Tunnel Architecture

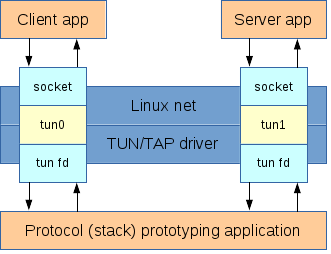
The client and server applications send and receive traffic using the traditional unix socket interface. Traffic is routed through the TUN/TAP interfaces, which appear as regular network interfaces to the Linux networking stack. However, the TUN/TAP interfaces are backed by file descriptors. These file descriptors are the interface that the prototyping application is using to receive and send the traffic from/to the TUN/TAP interfaces. This application acts as the MAC+PHY layers for the TUN/TAP interfaces.

Depending on the application, either TUN or TAP interfaces can be used:

  • TUN interfaces appear as IP-only interfaces: point-to-point interfaces that have no MAC layer. In this case, no ARP is necessary because no Ethernet header is generated and raw IP packets are sent directly to the interface. The prototyping application receives/sends raw IP packets.
  • TAP interfaces appear as normal Ethernet interfaces with a MAC layer. In this case, ARP is necessary because an Ethernet header needs to be generated with the appropriate destination MAC address. The prototyping application receives raw Ethernet frames.

TAP interfaces are useful for applications where Layer 2 visibility between hosts is required. But for the typical use case described above, TUN interfaces are better suited because they eliminate the complexity of the MAC layer. Therefore, the rest of the article focuses on TUN interfaces.

Problem Definition

Let's say that tun0 is configured with IP address 192.168.13.1 and tun1 is configured with IP address 192.168.13.2. Because they are point-to-point interfaces, we'll configure them by also specifying the IP address of the peer interface. This will automatically add a route to the peer IP address through the local interface.

ifconfig tun0 192.168.13.1 pointopoint 192.168.13.2
ifconfig tun1 192.168.13.2 pointopoint 192.168.13.1

We want to run the server application on 192.168.13.2 and connect to it with the client application, using an unbound socket. By default, the source IP address for unbound client sockets is the IP address of the outgoing network interface (in case it has multiple addresses, routing determines which one is used).

The problem is that normally all traffic that originates from the local host and is addressed to a local IP address is routed through the loopback interface (lo), regardless of what interface the destination IP address belongs to. That means the traffic will not flow (by default) through the TUN/TAP as we expect.

This can be tested using a sample application. It follows the typical use case described above and, for each packet that traverses the application, it prints the packet length in bytes and the incoming file descriptor. If we ping 192.168.13.2, we'll notice that we receive replies but the test application doesn't print anything. This means that the packets don't go through the TUN interfaces. By using tcpdump -nn -i lo we can easily confirm that they are going through the loopback interface instead.

Advanced Routing Configuration

In order to overcome the problems described above, some advanced Linux routing configuration is required. This section gives a brief description of the necessary routing concepts and the required configuration to make routing work as needed.

Multiple Routing Tables

Most common routing configuration tasks on Linux deal with a single routing table (like most routers do), but in fact Linux has multiple routing tables. When a route lookup is made by the Linux kernel, the route lookup does not begin in the routing table, but in the rule table. These rules are similar to some extent with iptables (because they match the packet by some configurable criteria) but decide which routing table to look up for a matching route. Like iptables, these rules are ordered and matched sequentially. The first rule that matches determines the routing table to use. If no matching route is found in the corresponding routing table, route lookup continues with the next rule.

To manipulate these rules (and also to configure advanced parameters for routes), we'll use the iproute2 package, which provides the "Swiss Army Knife" tool called ip. The legacy route Linux command provides no support for rule management and only limited support for route management.

# ip rule ls
0:      from all lookup local 
32766:  from all lookup main 
32767:  from all lookup default 

Each rule has a corresponding number and rules are matched in increasing order of their number.

By default, Linux has 3 routing tables. Each table is identified by a unique number, but also a name can be assigned by configuring it in /etc/iproute2/rt_tables. The 3 default routing tables are:

  • local - contains local and broadcast routes, i.e. routes to the IP addresses assigned to interfaces and to the broadcast IP addresses;
  • main - these are "regular" routes and correspond to the legacy routing table in Linux;
  • default - this table is empty.

Local Routing

We have already seen that all locally originated traffic to the IP address of tun1 (or tun0, for that matter) goes through the lo interface. However, this is neither magic, nor some hard-coded decision in the Linux kernel. It happens because when an IP address is configured on an interface, by default a corresponding route is added to the local routing table. If we examine it with ip route ls table local, we can observe the routes for tun0 and tun1:

local 192.168.13.1 dev tun0  proto kernel  scope host  src 192.168.13.1 
local 192.168.13.2 dev tun1  proto kernel  scope host  src 192.168.13.2 

These routes can be easily removed like this:

ip route del 192.168.13.1 table local
ip route del 192.168.13.2 table local

Now half of the problem is solved. The next routes that are matched are the implicit routes created by the pointopoint attribute that we used when we configured the IP addresses. This attribute creates an implicit route to the point-to-point address (the IP address of the "peer" interface) through the local interface. These routes live in the main table, which is the default for the ip route command and also the table used by the legacy route command. We can view these routes by using the ip route ls command:

192.168.13.1 dev tun1  proto kernel  scope link  src 192.168.13.2 
192.168.13.2 dev tun0  proto kernel  scope link  src 192.168.13.1 

At this point we can try to ping the IP address of tun1, e.g. by using ping -c 1 -W 1 192.168.13.2. We'll notice three things:

  • The prototyping application receives the packet going through tun0 and delivers it to tun1. Note: the packet will appear as outgoing (egress) for tun0 and incoming (ingress) for tun1. The debug message coming from the prototyping application is this: read 84 from fd 3.
  • If we use tcpdump on tun1 (e.g. tcpdump -nn -i tun1), we can see the packet as being received by tun1: IP 192.168.13.1 > 192.168.13.2: ICMP echo request, id 18793, seq 1, length 64.
  • However, the ping doesn't receive any reply and fails: 1 packets transmitted, 0 received, 100% packet loss, time 0ms.

Ingress Packet Processing

So what's wrong with our current configuration? The problem is that our packets pop out of tun1 (on tun1 ingress), but the kernel does not recognize them as being addressed to the local host. If we examine the Netfilter packet flow diagram, we'll notice there is a "routing decision" on the input path. This routing decision tells the kernel what to do with the packet that just arrived.

In order to determine if a packet is addressed to the local host, the kernel does not look at the IP addresses that are configured on the interfaces, as most people would expect. What it does instead is use the "routing decision" on the input path. This is a very clever (but not so obvious) optimization. A routing decision on the input path is needed anyway: for a Linux box that acts (mainly) as a router, the routing decision is needed to determine where (to what interface) the packet needs to go. This is standard routing theory. Now the clever part is that the same routing decision is used in order to determine if the packet is addressed to the local host: the condition is to match a local type route, where both the interface and the IP address match.

Wait a minute! The routes that we need in order to accept the packets and process them as addressed to the local host are the routes that we previously deleted. It turns out that these local type routes actually serve two purposes:

  • On the output path, they make the packets go through the lo interface.
  • On the input path, they make the packets be treated as addressed to the local host and processed as such.

Splitting Input and Output Routing

Luckily, the output and input routing decisions are different. Of course they are. What I mean is that they are triggered from different parts of the network stack code, with different "parameters". This is also suggested by the Netfilter packet flow diagram, where the two routing decisions are illustrated by distinct blocks (one on the input path and one on the output path).

The solution to our problem is to take advantage of the distinct routing decisions and configure routing in such a way that the local type routes are only "seen" by the input routing decision. The key here is to use a rule that matches the input interface: the iif parameter to the ip rule command. The rule will match only during the input routing decision, where the "input interface" attribute of the packet is set to the interface that received it (tun1 in our example). During the output routing decision, the "input interface" attribute of the packet is not set and will not match the rule (actually, in the kernel code, interface "indexes" are used for this attribute and, during the output routing decision, the attribute is set to 0 - which doesn't correspond to any interface, since valid interface indexes start at 1).

The commands for accepting incoming traffic on tun0 are:

ip route add local 192.168.13.1 dev tun0 table 13
ip rule add iif tun0 lookup 13

The commands for accepting incoming traffic on tun1 are:

ip route add local 192.168.13.2 dev tun1 table 13
ip rule add iif tun1 lookup 13

Note that for accepting incoming packets on tun1, only the 2nd set of commands is necessary. However, this is still not enough for the ping to work, because this only solves the problem of the ICMP echo request (going from 192.168.13.1 to 192.168.13.2). This packet will be accepted and the IP layer will generate a corresponding ICMP echo reply, from 192.168.13.2 to 192.168.13.1. The reply packet will have the same problem when it's received by tun0.

This can be tested by adding first (only) the route and rule for tun1. Then the following behaviour will be observed.

tcpdump shows both packets (request and reply):

IP 192.168.13.1 > 192.168.13.2: ICMP echo request, id 19377, seq 1, length 64
IP 192.168.13.2 > 192.168.13.1: ICMP echo reply, id 19377, seq 1, length 64

The prototyping application transports both packets:

read 84 from fd 3
read 84 from fd 4

But the ping still doesn't work until the route and rule for tun0 are added.

Of course, ping is just a simple test. But in the configuration described above, all kinds of traffic works. The configuration has been successfully tested with http and ftp.

References

udisks2 Mount Path

udisks2 is the package that (among many other things) is responsible for automatically mounting removable media under /media. Well, not directly under /media - it creates on-the-fly a new subdirectory with the volume label (or uuid, or serial number, depending on the mounted filesystem type) and then mounts the removable media in that subdirectory.

Starting with Fedora 17, udisks2-1.94, the mount path has changed from /media to /var/run/media/<username>, where username represents the currently logged in user. If you use the command line a lot (like I do), it's not very convenient to type all these path components (even with autocompletion). Perhaps the reason behind this change was to avoid mount point conflicts (and permission problems for filesystems that don't support UNIX permissions) between multiple logged in users. But I doubt that two (or more) different users can mount the same volume in two different places at the same time.

I created a small patch against udisks-1.94 that reverts the mount location to /media. The patch is trivial, it just disables the code block that calculates the path in /var/run. Fallback to the old /media location was already implemented.

Home ← Older posts